Let’s learn how to select a photo from a user’s photo library and import it into an application. For this functionality we will use the UIImagePickerController within Swift 4. We will not be using a storyboard for this tutorial as we will create the UI all from code.
What?
We will create the UI using code and when the application launches we will display a UIImageView with a default image. When the image view is tapped we will allow the user to select an image from the photos library. Once an image is selected we will display it within the application.
How?
Create a new single view application project and select Swift for the language.
Open the ViewController.swift file. We will need a default image to display when the application launches. Find an image you would like to use and drag it into your Assets.xcassets folder.
Create a UIImageView before the viewDidLoad function setting the photo you dragged into the assets folder to the default image. I am using an image named ‘noImageImage’.
This file contains hidden or bidirectional Unicode text that may be interpreted or compiled differently than what appears below. To review, open the file in an editor that reveals hidden Unicode characters.
Learn more about bidirectional Unicode characters
| import UIKit | |
| class ViewController: UIViewController{ | |
| // create the image view | |
| private var yourImageView = UIImageView(image: #imageLiteral(resourceName: "noImageImage")) | |
| override func viewDidLoad() { | |
| super.viewDidLoad() | |
| } | |
| } |
Now let’s set up the image view and display it in the viewDidLoad function.
We want to display the photo selector when the UIImageView is tapped. For this we need to enable interaction on the image view and create a tap gesture recognizer.
Let’s also center the image view before we add it as a sub view.
This file contains hidden or bidirectional Unicode text that may be interpreted or compiled differently than what appears below. To review, open the file in an editor that reveals hidden Unicode characters.
Learn more about bidirectional Unicode characters
| import UIKit | |
| class ViewController: UIViewController{ | |
| // create the image view | |
| private var yourImageView = UIImageView(image: #imageLiteral(resourceName: "noImageImage")) | |
| override func viewDidLoad() { | |
| super.viewDidLoad() | |
| // enable user interaction | |
| yourImageView.isUserInteractionEnabled = true | |
| // add a tap gesture recognizer (Create the selector function below) | |
| yourImageView.addGestureRecognizer(UITapGestureRecognizer(target: self, action: #selector(selectPhoto))) | |
| // center the image | |
| yourImageView.center = self.view.center | |
| // add your image view as a subview to the current view | |
| view.addSubview(yourImageView) | |
| } | |
| } |
At this point you will notice an error message coming from the gesture recognizer action. We declared the action to be a method named ‘selectPhoto’ and now we need to create that method. The ‘selectPhoto’ method will load the UIImagePickerController. Declare an instance of UIImagePickerController up right after the declaration of our UIImageView so it can be used from anywhere in the class.
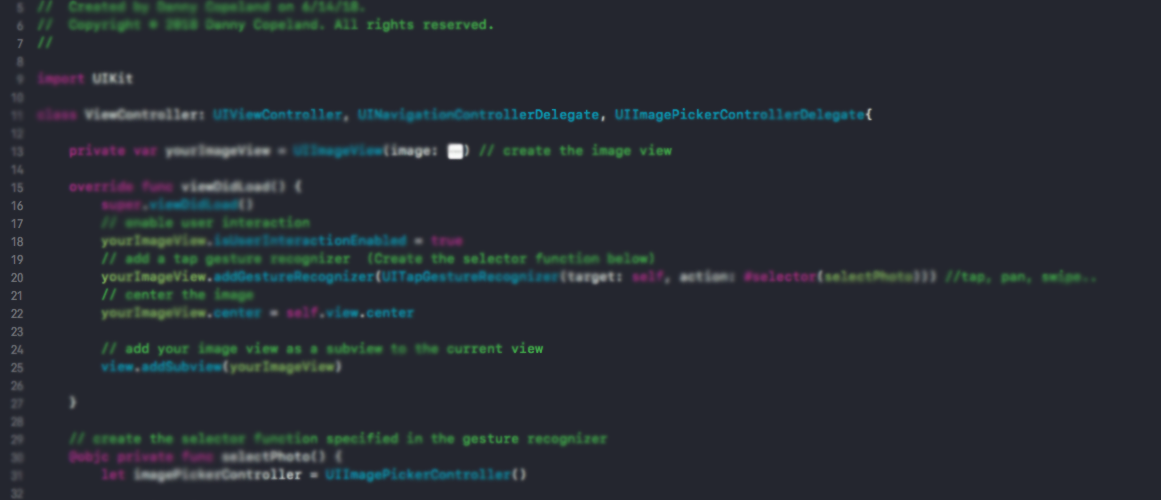
To use the UIImagePickerController we need to adopt 2 protocols. The UIImageViewControllerDelegate which needs the UINavigationControllerDelegate.
In the viewDidLoad inform the ViewController know that it will be the delegate for our UIImagePickerController by setting the delegate to self. Add the 2 protocols to the ViewController. Your ViewController.swift file should now look like this:
This file contains hidden or bidirectional Unicode text that may be interpreted or compiled differently than what appears below. To review, open the file in an editor that reveals hidden Unicode characters.
Learn more about bidirectional Unicode characters
| import UIKit | |
| //add the protocols | |
| class ViewController: UIViewController, UINavigationControllerDelegate, UIImagePickerControllerDelegate{ | |
| // create the image view | |
| private var yourImageView = UIImageView(image: #imageLiteral(resourceName: "noImageImage")) | |
| // create the image picker controller | |
| private let imagePickerController = UIImagePickerController() | |
| override func viewDidLoad() { | |
| super.viewDidLoad() | |
| // enable user interaction | |
| yourImageView.isUserInteractionEnabled = true | |
| // add a tap gesture recognizer (Create the selector function below) | |
| yourImageView.addGestureRecognizer(UITapGestureRecognizer(target: self, action: #selector(selectPhoto))) | |
| // center the image | |
| yourImageView.center = self.view.center | |
| // add your image view as a subview to the current view | |
| view.addSubview(yourImageView) | |
| //Inform the view controller that it will be the delegate for the UIImagePickerController | |
| imagePickerController.delegate = self | |
| } | |
| // create the selector function specified in the gesture recognizer | |
| @objc private func selectPhoto() { | |
| } | |
| } | |
Now we need to present the picker in the select photo method.
We also need to implement 2 methods for the picker controller to handle canceling the photo selector and for when a photo is selected.
The canceling will be handled by the imagePickerControllerDidCancel method where we will just dismiss the picker.
When a photo is selected the imagePickerController didFinishPickingMediaWithInfo method will be called. We will use optional binding to get the image selected and set it as the image for our UIImageView. Dismiss the picker after to return to our app and the image select should be displayed.
Here is the final ViewController.swift file code:
This file contains hidden or bidirectional Unicode text that may be interpreted or compiled differently than what appears below. To review, open the file in an editor that reveals hidden Unicode characters.
Learn more about bidirectional Unicode characters
| import UIKit | |
| //add the protocols | |
| class ViewController: UIViewController, UINavigationControllerDelegate, UIImagePickerControllerDelegate{ | |
| // create the image view | |
| private var yourImageView = UIImageView(image: #imageLiteral(resourceName: "noImageImage")) | |
| // create the image picker controller | |
| private let imagePickerController = UIImagePickerController() | |
| override func viewDidLoad() { | |
| super.viewDidLoad() | |
| // enable user interaction | |
| yourImageView.isUserInteractionEnabled = true | |
| // add a tap gesture recognizer (Create the selector function below) | |
| yourImageView.addGestureRecognizer(UITapGestureRecognizer(target: self, action: #selector(selectPhoto))) | |
| // center the image | |
| yourImageView.center = self.view.center | |
| // add your image view as a subview to the current view | |
| view.addSubview(yourImageView) | |
| //Inform the view controller that it will be the delegate for the UIImagePickerController | |
| imagePickerController.delegate = self | |
| } | |
| // create the selector function specified in the gesture recognizer | |
| @objc private func selectPhoto() { | |
| //present the image picker controller | |
| present(imagePickerController, animated: true, completion: nil) | |
| } | |
| // handle when photo is selected | |
| func imagePickerController(_ picker: UIImagePickerController, didFinishPickingMediaWithInfo info: [String : Any]) { | |
| // use optional binding | |
| if let imagePicked = info[UIImagePickerControllerOriginalImage] as? UIImage { | |
| yourImageView.image = imagePicked | |
| dismiss(animated: true, completion: nil) | |
| } | |
| } | |
| //handle the cancel | |
| func imagePickerControllerDidCancel(_ picker: UIImagePickerController) { | |
| dismiss(animated: true, completion: nil) | |
| } | |
| } | |
Run the application and your default image will be displayed. Tap the image to be taken to your photo library and select a new image. Once selected the photo library will dismiss and the new image will be displayed in the app.
Conclusion
Utilizing the UIImagePickerController we discovered how to import an image from a device with no storyboard using just a short amount of Swift code.
There are certainly more options to be explored, like using popovers to provide the above functionality if the users device is an iPad, camera options, etc. Check out the documentation and sources below for more information.
Let me know if you have any questions and thanks for stopping by!
Sources: